Transitioning from Papers 3 to Bookends: Part 2 - The How

After making the radical decision to uproot my reference management system, I decided to take the plunge with Bookends ($73.99 for MacOS+iOS version with an additional $9.99 per year Pro features on iOS). I now had the seemingly formidable task of moving all my PDFs and their attached references from Papers into Bookends. Spoiler: I managed to do this with relative ease.

Here are the steps I followed for my transition from Papers to Bookends (including the associated setbacks and successes):

0. Trying out Bookends

Before moving your entire database(s) to Bookends, I suggest you try out some simple functionality by dragging and dropping (or searching for) a PDF of a paper and check whether an accurate reference is retrieved. You also have the option of autocompleting an entry (Refs → Autocomplete Paper or Cmd+Shift+C). Try editing a reference manually and get familiar with the Bookends interface. I strongly recommend reading the official website’s FAQ, tutorials, support as well as the provided documentation.

1. “Import References from Papers”

Bookends has a handy built-in option to import references from Papers (or Sente or EndNote): File → Import References

Outcome: All the references move into Bookends but not the PDFs (or attachments, in Bookends’ parlance).

Potential Problems: If you receive a “no references exported from Papers” error, try restarting Bookends (while keeping Papers open).

2. Set up a preferred PDF naming structure

Explore writing your own reference and citation formats

Bookends can automatically rename an imported PDF based on the reference that it eventually retrieves. For example, Bookends can make s2-342439.pdf into Thirumalai-2011-Journal-Geol.pdf after crawling through the text. If you’d like to, you can customize this structure by first making (or choosing) a format in the manager: Biblio → Formats Manager.

Outcome: You will be able to choose your preferred naming structure in the preferences.

3. Optional: Set yourself up for iOS usage

Designate the format for renaming PDFs in Bookends and assign the attachments’ folder to the one in your iCloud drive

If you intend on using Bookends on iOS, make sure you go ahead and download the app now. Follow instructions here to import a PDF through a search engine. Ensure that sync has been enabled; now, a ‘Bookends’ folder will be created in your iCloud directory.

On the desktop version, open up preferences and in the drag-down list, choose iCloud Folder for iOS Sync as your attachments folder. The default, inside Documents, does not jive if you want to have an iCloud-synced iOS version, so you might as well follow the above steps even if you don’t want to use the iOS version (the free app supports this as well).

Outcome: You have a folder titled “Bookends” under iCloud Drive.

4. Find all your Papers' PDFs:

Find and consolidate all the PDFs stored in Papers’ virtual library.

Since you’ve already imported references from Papers, Bookends will be populated, but they will not have PDFs attached to them. If imported correctly, it will yield an error that the PDF (with a long, machine-readable string name) cannot be found. This problem stems from Papers’ opaque Virtual Library and file handling system. But this also poses an advantage: now we simply need to gather all the PDFs wherever Papers stores them (with intact names!) and paste them into the Bookends’ folder (inside the iCloud drive).

Go to your Papers’ virtual library/database location in Finder to start this procedure. In this overarching structure, search for .pdf and then ‘add’ a search where you filter by PDF kinds.

Outcome: You are able to select all the originally-named Papers PDFs under one search.

5. Move the PDFs to your Bookends Folder

Before you move anything, make sure that Bookends on your desktop is closed.

Depending on the number of PDFs you have, I would recommend moving in segments. For context, I copied ~1500 PDFs (of ~5000) from the Papers’ search folder and pasted into the Bookends folder (in iCloud Drive) first before doing the rest. The time for the overall transition including the wait for iCloud to upload all these files (make sure there are no small ‘uploading’ clouds visible in Finder!) was about ~20 mins.

Outcome: You have all your Papers’ PDFs in the Bookends Folder.

6. Allow Bookends to do its thing

Batch Edit: rename all your attachments

Open up Bookends, and if the attachment folder has been set to the one under the iCloud drive appropriately, all your references ought to have PDFs attached to them! Scroll through the references and make sure that PDFs are attached.

Now, since nobody likes those cruddy long, undecipherable names that Papers provides, let’s rename the PDFs based on our chosen format. Refs → Global Change → Rename Attachments. This took about ~35 minutes for me.

And - that’s it!

Outcome: All your Papers’ references are in Bookends, with PDFs intact, AND the PDFs are all inside the Bookends folder, named based on the structure you chose! Voila!

If you followed these steps, you ought to be able to open up Bookends on iOS and slowly wait for the iCloud sync to weave its magic.

Mathkey: A great resource for LaTeX on iOS

I’ve been using LaTeX (enjoyably!) on iOS for quite some time now. It is *still* remarkable to me that I can continue chipping away at a manuscript that I was working on in the office outside at the park — on a piece of glass. For those not in the know, LaTeX is a typesetting language that has many uses, and can be particularly useful for writing manuscripts.

After graduating from a 8.2” iPad Mini 2.0 to a 9.7” 6th generation “educational” iPad, I’ve been getting more and more writing done on iPad. The larger screen is more conducive for split-screen usage and the Apple Pencil compatibility is awesome (gives my post on note-taking tools a whole new depth - I should revisit that). Texpad is still my LaTeX editor of choice (I wish this could somehow be integrated with Overleaf) and its latest version, with several updated tools, makes editing in LaTeX rather simple. Although Texpad’s symbol editor tool is handy, I recently came across an app that makes complex typesetting, and equations, in particular, easy and intuitive.

Cue: Mathkey. The iPad app costs $7.99 (rather reasonably priced IMO; although it is also available via Setapp) and is available on the iPad as well as the iPhone (and Macbook). Essentially, it is a LaTeX keyboard (add it under General->Keyboard) that receives input via touch, and can produce output as text or as an image. What exactly does Mathkey do? Instead of struggling with symbol/equation typesetting, Mathkey uses the MyScript engine to parse handwritten equations into an image or as snippets of LaTeX code (as plaintext) that you can insert into your editor of choice. This becomes especially powerful when you have an external keyboard for typing opened with Mathkey as your active keyboard. I’ve been using Mathkey for about 3 months now and its accuracy is rarely off. On the iPad, using Mathkey with the Apple Pencil has been delightful. Finally, Mathkey can also remotely connect to the Macbook so that you can write equations on the iPad/iPhone while editing LaTeX on the Mac.

All in all, this app is a worthy addition to my (iOS-)LaTeX workflow. Here is a screencast of Mathkey usage:

Review: Note-Taking Apps on the iPad

I've been a little late to the party after having acquired an iPad (I'm using an iPad Mini 4), but I've finally delved a little deeper into (handwriting) note-taking apps. Although I am a big proponent of putting pen on paper, taking digital notes to boost academic productivity makes a lot of sense for many reasons including a lighter load to carry, optical character recognition, easy digital access to your favorite file management system, quick incorporation of media into your notes etc. Currently, I still prefer my fountain pen and paper for brainstorming and refining ideas, but over the last few weeks, I’ve found that note-taking apps have been very useful in navigating the day-to-day activities of academia including meetings, seminars, and Skype sessions.

When it comes to handwriting apps on the iPad, in my opinion, a stylus is essential. I haven't caved in yet for an Apple pencil but I have found a really good stylus which I would recommend (and is much cheaper!) A stylus is especially useful because most of these apps have a magnifier feature which makes it easier to write neatly and organize your notes. I've tried out three different apps and this post details the pros and cons according to my experience.

The apps I've looked into:

  1. Penultimate (Free)
  2. Notability ($9.99)
  3. GoodNotes ($7.99)

Penultimate

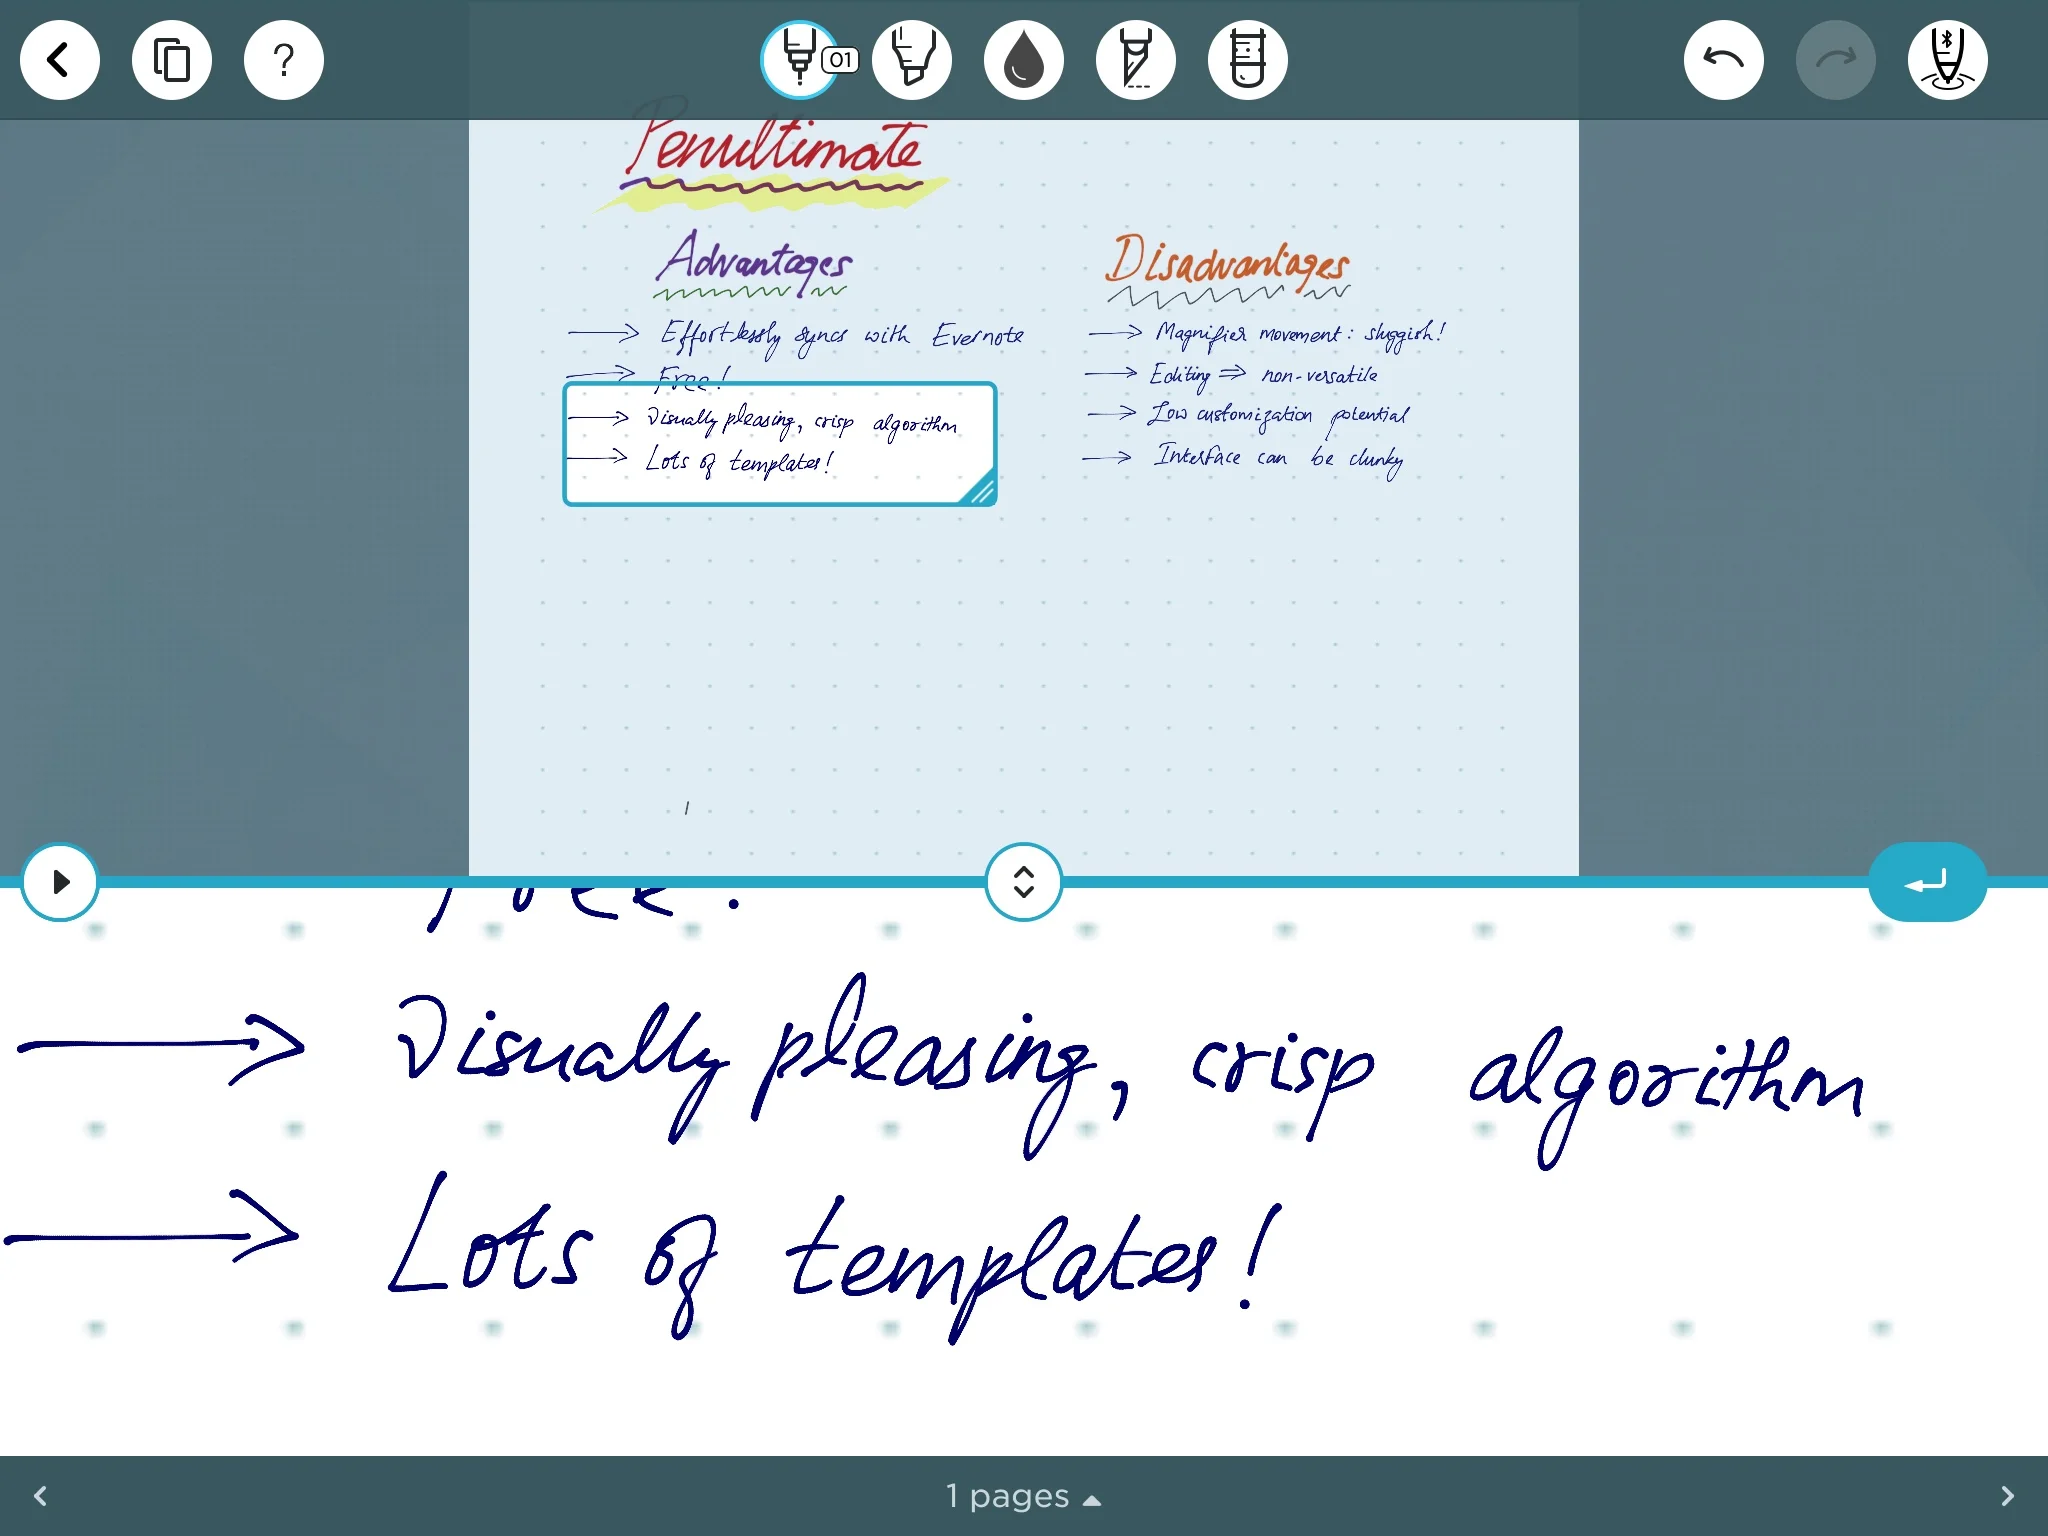
An example screenshot from Penultimate.

An example screenshot from Penultimate.

Pros

  • It's FREE!
  • Seamless sync with Evernote
  • Great variety and breadth of templates to choose
  • Colors and lines are visually pleasing
  • Handwriting algorithm renders a rather crisp display which is aesthetically pleasing

Cons

  • No Optical Character Recognition (OCR) feature
  • The "auto-scroll" option while on magnification is really clunky
  • Difficult to organize and subcategorize notes
  • No multi-tab feature and overall basic customization
  • Cannot set different margins for return on magnifier
  • No sound recording option
  • Not intuitive to incorporate images/media
  • Cannot edit the notes via freehand option on Evernote

Verdict: Penultimate was the first app I tried out because it was free and synced with Evernote (a file management software I use heavily). It is a good app to get your feet wet but with several missing features that make note-taking apps work for academic productivity, such as OCR, organization utility, and smooth movement on magnification, it doesn't make the final cut. 


Notability

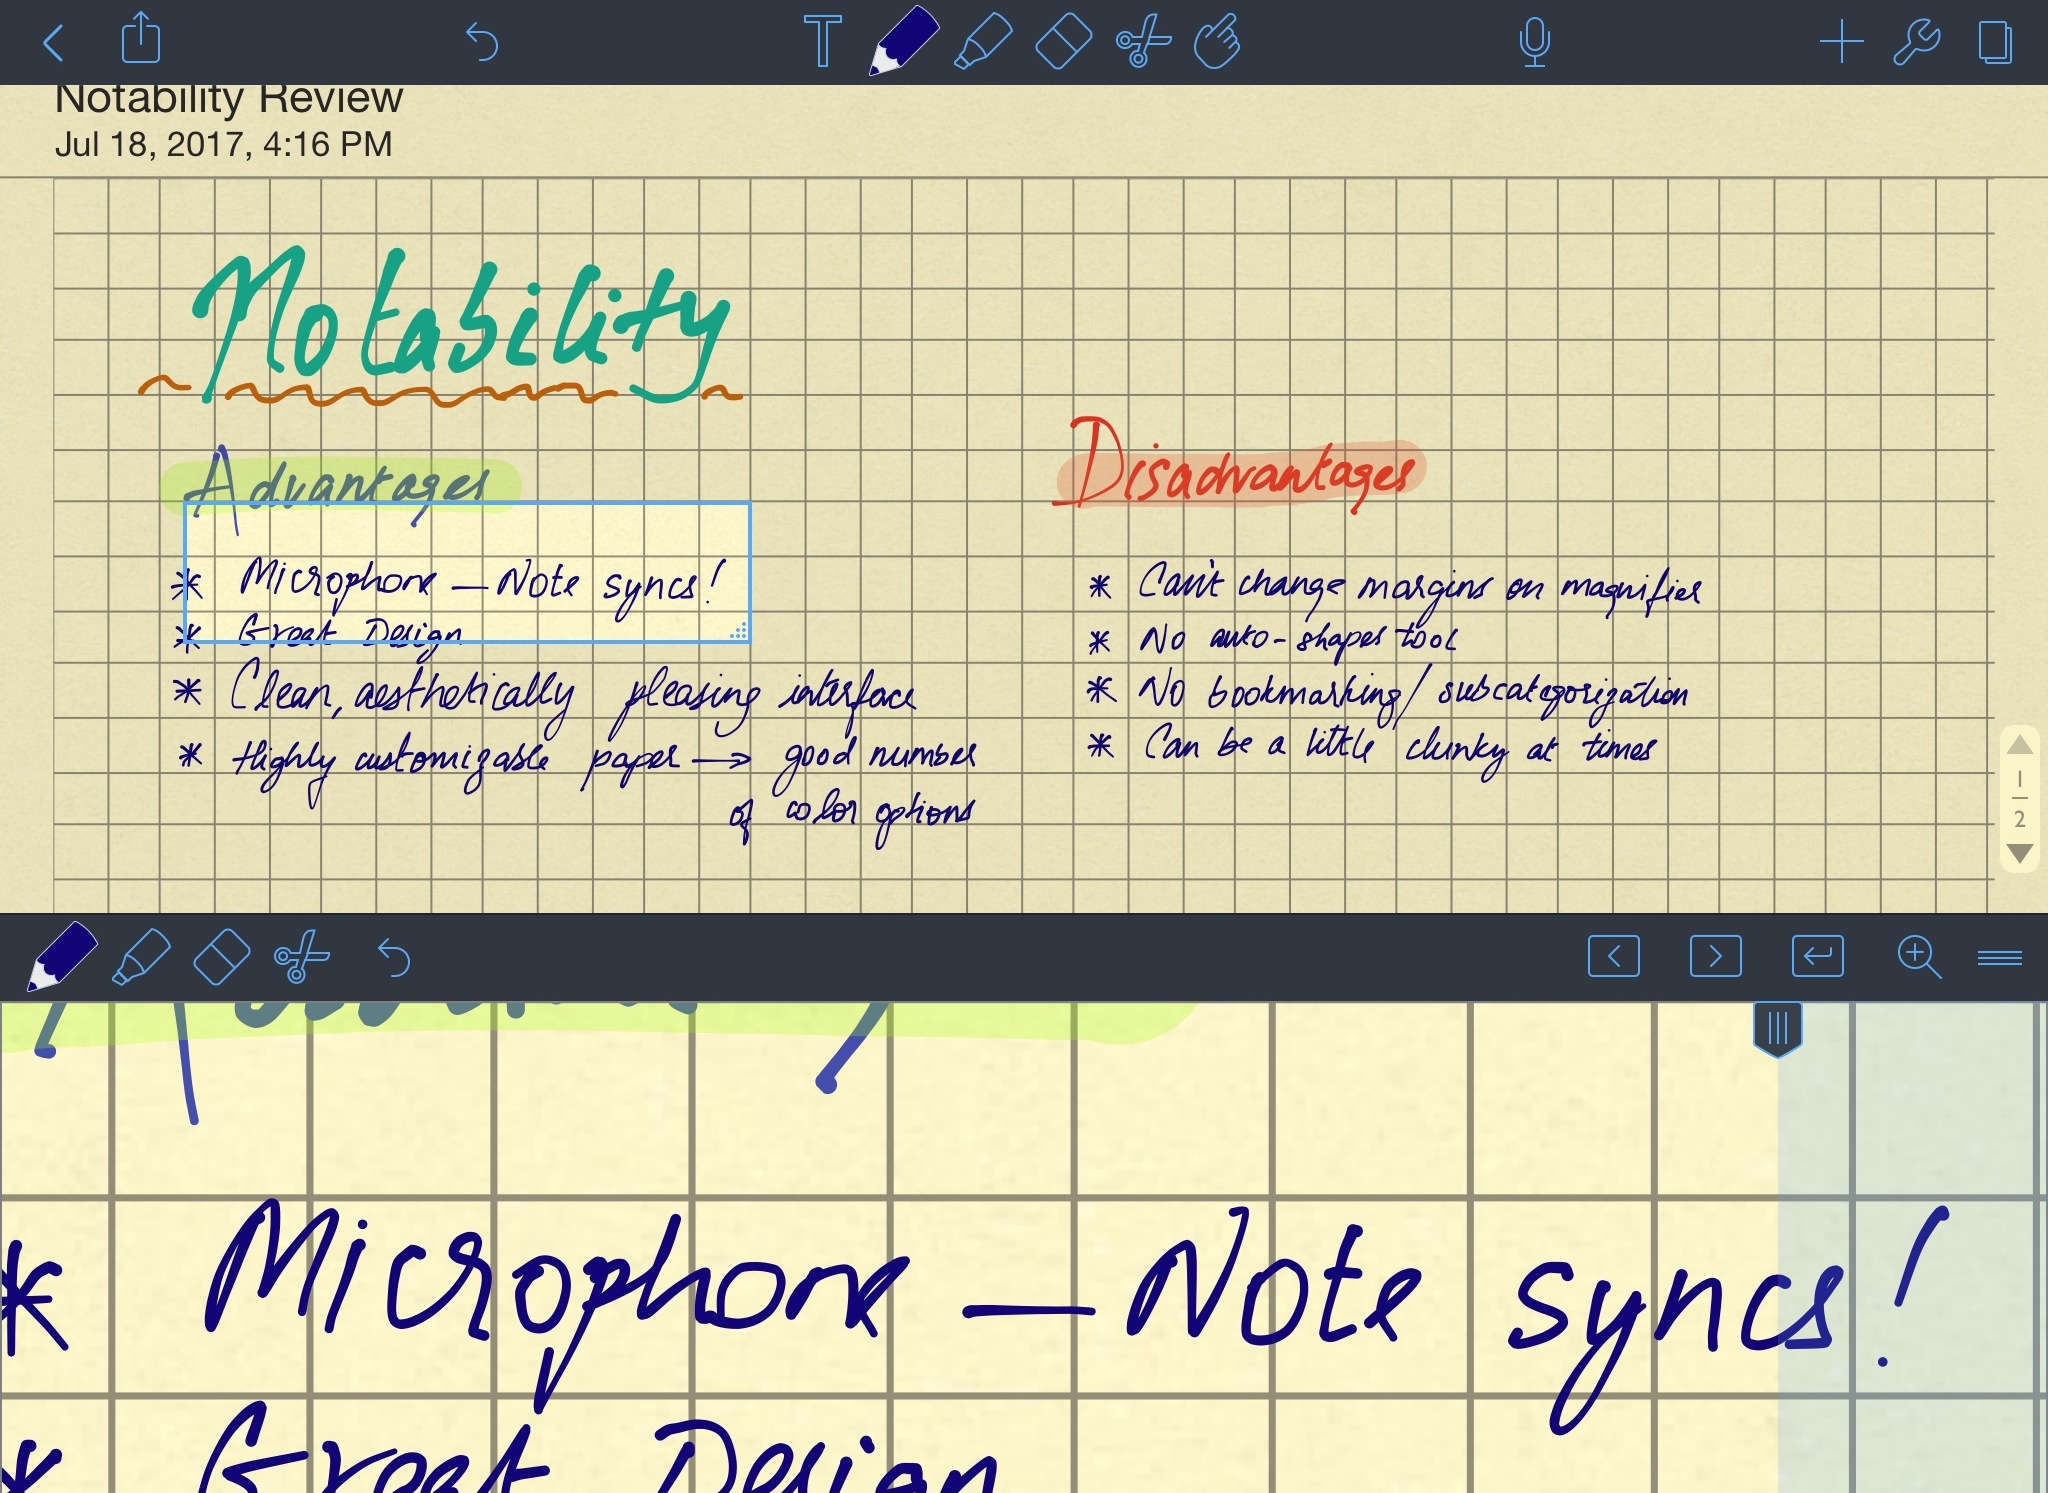
An example screenshot from Notability.

An example screenshot from Notability.

Pros

  • You can record notes with your microphone! Furthermore, you can playback the audio with an in-situ note-taking sync!
  • The design is clean, minimal, and effective
  • Highly customizable backgrounds
  • The handwriting algorithm is really smooth

Cons

  • It's expensive as far as iPad apps go...
  • No OCR feature
  • No auto-shape tool which can be very useful for annotation and organization
  • The margins on magnifier can't be changed (useful for column-type note writing)
  • Subcategorization and bookmarking features aren't available
  • Not a lot of diversity in templates

Verdict: Notability is a great app on the whole, with its design and interface being truly top-notch. The real winner for Notability is its note-sync-enabled microphone option and if this is something that appeals to you, it' really the way to go. The dealbreaker for me was the lack of OCR, where you can select your handwritten text and convert it into characters. 


GoodNotes

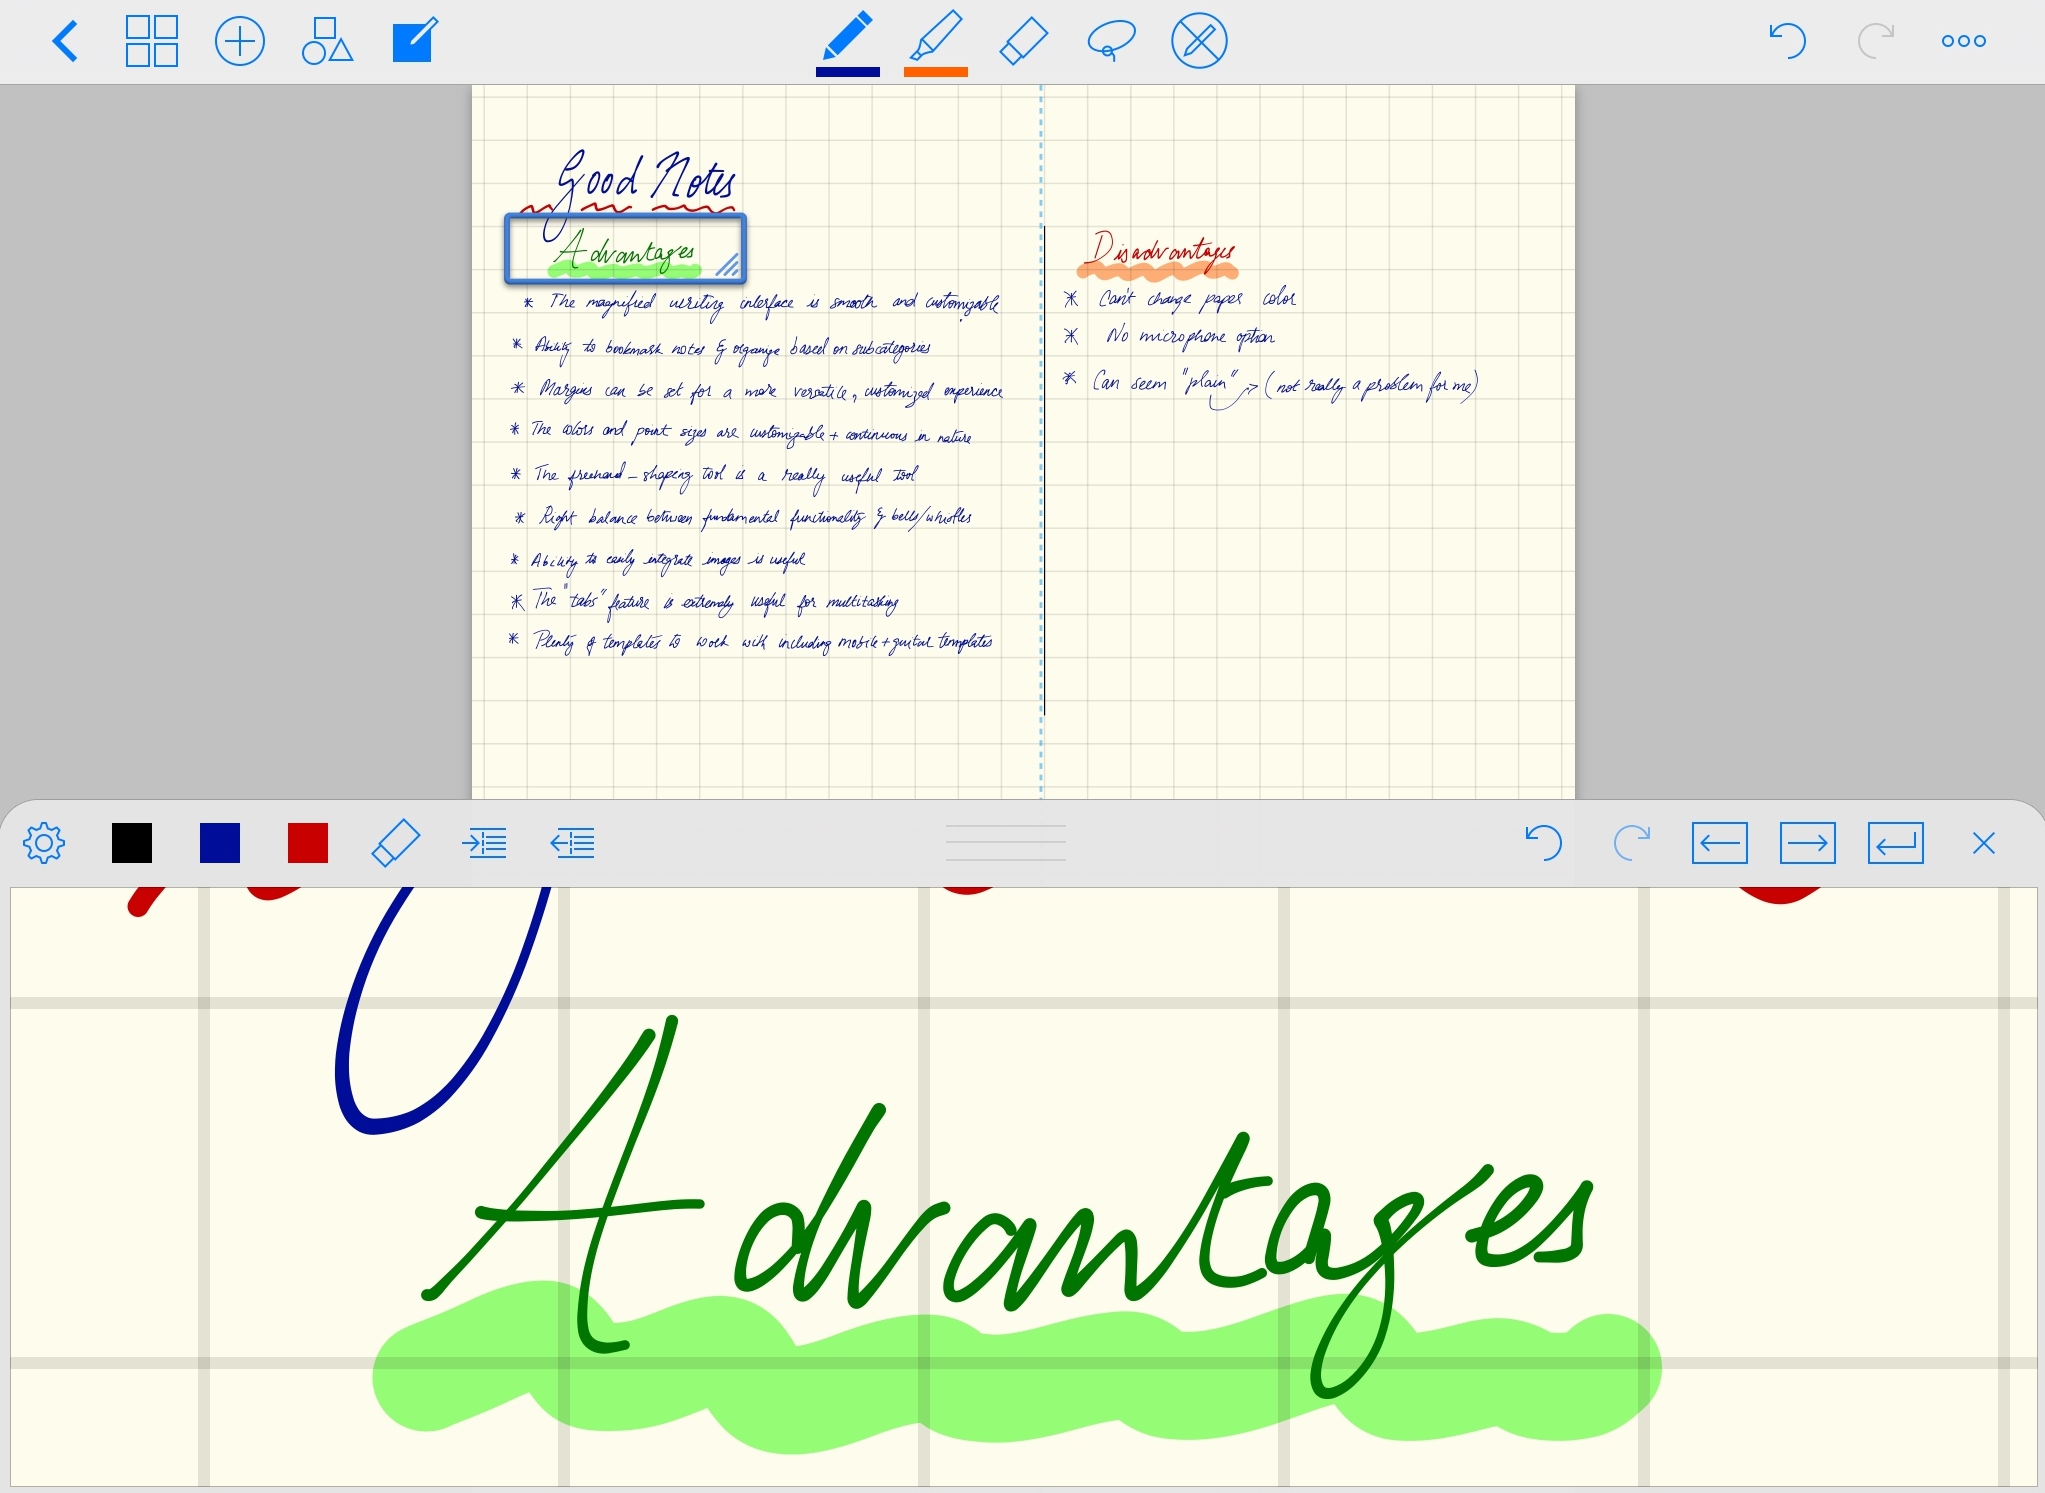
An example screenshot from GoodNotes.

An example screenshot from GoodNotes.

Pros

  • OCR enabled! This gives quick access to a multitude of workflows and avenues for sharing (tweet on the fly etc.)
  • Magnification mode works seamless and ability to set different margins is very useful
  • The ability to bookmark and subcategorize 'notebook shelves' makes organization a breeze
  • Colors and point sizes are highly customizable
  • The freehand tool that produces automatic shapes (lines/circles etc.) is really useful
  • Multi-tab feature is highly effective for multitasking
  • Plenty of templates including mobile+guitar templates
  • Integrating media (PDFs/images) into the app is intuitive and effective

Cons

  • No microphone recording feature
  • Background paper color is fixed
  • Doesn't have as many bells and whistles as the others, making for a rather "plain" interface (although, this isn't really a problem for me)

Verdict: GoodNotes emerges as an easy winner for my needs. The balance between customization, features, and utility makes it simply "work" when needed and this is a huge plus for me. The magnification mode on GoodNotes proved to be the smoothest interface (with customizable margins) and sometimes you forget that you are (in the future!) and writing on a glass tablet. The lack of a recording option is unfortunate but honestly, even while I was on Notability, it was not something that I used frequently. Over the last few weeks, I have written several notes using GoodNotes and its organizational structure along with Evernote workflows caters to all my note-taking requirements.


TL;DR Verdict:

  • If you are picky about organizing your notes and want a great interface that simply "works",  GoodNotes is a fantastic bet.
  • If recording audio while taking down notes is something that appeals to you (can be useful to students in classrooms), go with Notability.
  • If you want to stick with a free app and get the ball rolling with handwriting apps, Penultimate is a solid option.